Deploy monitoring for a large IT system with 4 CSV files
Why CSV is an ideal format for large-scale monitoring
The rapid growth of information systems, the heterogeneity of environments and increasing pressure on IT teams are making monitoring increasingly complex. When it comes to monitoring hundreds or even thousands of devices, manual approaches quickly reach their limits. Monitoring via CSV files in ServicePilot provides a simple, scalable solution that is perfectly suited to large IT systems.
CSV has established itself as a standard in IT environments. Its simplicity makes it a powerful tool for orchestrating large-scale monitoring.
- Universal and interoperable: compatible with Excel, scripts, CMDB, inventory tools
- Automated: easy to generate via PowerShell, Bash, Python or CI/CD pipelines
- Readable and editable: ideal for quick reviews and bulk corrections
- Versionable: can be integrated into Git or SVN to track changes
- Fast: load hundreds or thousands of devices in seconds
By combining these advantages, CSV becomes a natural connection between the IT inventory and the monitoring platform.
How to monitor an entire IT system with 4 CSV files?
1. Prerequisites and preparation before CSV import
Before setting up a CSV import workflow in ServicePilot, a few technical prerequisites ensure reliable, secure and high-performance monitoring, especially in large distributed environments.
Agent deployment
For servers (physical or virtual), the most detailed and reliable monitoring is based on the installation of a ServicePilot Agent per machine. This agent offers several advantages:
- Detailed local collection of system metrics (CPU, RAM, disks, processes, etc.)
- Advanced monitoring (network traffic, logs, application transactions, etc.)
- Simplified configuration
Deploying SPProxy
In multi-site or multi-data center architectures, it is recommended to deploy one SPProxy per DC. This component plays an essential role:
- It centralizes communications between local equipment and the ServicePilot platform
- It drastically reduces network flow openings, avoiding direct exposure of internal infrastructures
- It constrains monitoring traffic within the data center, limiting latency and improving resilience
- It facilitates scaling by funnelling collection through different proxies
The deployment of agents can be automated and carried out en masse using GPO or Ansible-type scripts. A SPProxy is but a resource deployed on an agent. The combination of a proxy per DC and an agent per server provides a solid foundation for industrializing monitoring, while ensuring security, performance and simplified network management.
View modeling
View modeling is a key step in any monitoring deployment via CSV files. This preparation ensures that the CSV import does not create “flat” monitoring, but rather scalable, usable and structured monitoring.
Why model views upstream?
- Structure the Information System: Views enable the logical or business organization of the information system to be represented: sites, environments, applications, services, equipment.
- Ensure the consistency of CSV imports: Each line of a CSV has a clear place in the tree structure.
- Facilitate navigation and analysis: Well-designed views enable teams to quickly identify impacts, anomalies and priorities.
Key elements of good modeling:
- Hierarchical breakdown: Define levels with organization → site → domain → service → equipment → objects and metrics.
- Consistent nomenclature: Choose stable naming conventions for views, equipment and objects.
- Business alignment: Views must reflect how teams actually monitor the Information System.
Preparing API keys and the ServicePilot cluster
Preparing API keys for the cluster environment is a crucial step in ensuring the security and resilience of the monitoring deployment. API keys for the ServicePilot Cluster enable you to:
- Secure the Agent-Manager dialogue
- Secure access to provisioning APIs
- Route agents or provisioning requests to the correct node in cluster mode
Study of packages to be deployed
Packages determine the objects created, the metrics collected, the default thresholds and the associated dashboards.
Before any large-scale import, it is essential to adapt the CSV files to the fields expected by the ServicePilot packages, as each package imposes its own mandatory attributes—IP address, equipment type, credentials, discovery options, etc. This preparation ensures that the objects created will be complete and functional as soon as they are imported.
At the same time, selecting and standardizing the packages to be used makes it possible to standardize deployment across the entire IT system.
2. Preparing CSV files
CSV file for views
To ensure smooth import and consistent organization of objects in the tree structure, it is essential to prepare a CSV file dedicated to views, as this provides the logical structure into which all monitored elements will be inserted.
Template for Views :
# Creation of two “Customer” views, each spread across three sites with sub-views by technical scope
name,oldname,view,x,y,width,height,shape,picture,enablegeo,latitude,longitude,autoarrange,description,display

# Main “Customer” views
Customer 1,,MAIN,350,250,60,60,image,building-office.svg,0,,,linear,,map
Customer 2,,MAIN,550,250,60,60,image,building-office.svg,0,,,linear,,map

# Site views
C1 - Site A,,Customer 1,,,30,30,image,building-office.svg,1,48.827522,2.240526,linear,adresse du site A du Customer 1,table
C1 - Site B,,Customer 1,,,30,30,image,building-office.svg,1,47.827522,2.240526,linear,adresse du site B du Customer 1,table
C1 - Site C,,Customer 1,,,30,30,image,building-office.svg,1,46.827522,2.240526,linear,adresse du site C du Customer 1,table

C2 - Site A,,Customer 2,,,30,30,image,building-office.svg,1,48.827522,2.240526,linear,adresse du site A du Customer 2,table
C2 - Site B,,Customer 2,,,30,30,image,building-office.svg,1,48.827522,1.240526,linear,adresse du site B du Customer 2,table
C2 - Site C,,Customer 2,,,30,30,image,building-office.svg,1,48.827522,0.240526,linear,adresse du site C du Customer 2,table

# Technical views
C1 - Site A - Network,,C1 - Site A,,,30,30,image,firewall-flame.svg,0,,,linear,,map
C1 - Site A - Servers,,C1 - Site A,,,30,30,image,server-server.svg,0,,,linear,,map
C1 - Site A - Applications,,C1 - Site A,,,30,30,image,activity-monitor-user-group.svg,0,,,linear,,map
C1 - Site B - Network,,C1 - Site B,,,30,30,image,firewall-flame.svg,0,,,linear,,map
C1 - Site B - Servers,,C1 - Site B,,,30,30,image,server-server.svg,0,,,linear,,map
C1 - Site B - Applications,,C1 - Site B,,,30,30,image,activity-monitor-user-group.svg,0,,,linear,,map
C1 - Site C - Network,,C1 - Site C,,,30,30,image,firewall-flame.svg,0,,,linear,,map
C1 - Site C - Servers,,C1 - Site C,,,30,30,image,server-server.svg,0,,,linear,,map
C1 - Site C - Applications,,C1 - Site C,,,30,30,image,activity-monitor-user-group.svg,0,,,linear,,map

C2 - Site A - Network,,C2 - Site A,,,30,30,image,firewall-flame.svg,0,,,linear,,map
C2 - Site A - Servers,,C2 - Site A,,,30,30,image,server-server.svg,0,,,linear,,map
C2 - Site A - Applications,,C2 - Site A,,,30,30,image,activity-monitor-user-group.svg,0,,,linear,,map
C2 - Site B - Network,,C2 - Site B,,,30,30,image,firewall-flame.svg,0,,,linear,,map
C2 - Site B - Servers,,C2 - Site B,,,30,30,image,server-server.svg,0,,,linear,,map
C2 - Site B - Applications,,C2 - Site B,,,30,30,image,activity-monitor-user-group.svg,0,,,linear,,map
C2 - Site C - Network,,C2 - Site C,,,30,30,image,firewall-flame.svg,0,,,linear,,map
C2 - Site C - Servers,,C2 - Site C,,,30,30,image,server-server.svg,0,,,linear,,map
C2 - Site C - Applications,,C2 - Site C,,,30,30,image,activity-monitor-user-group.svg,0,,,linear,,map
Modeling with Auto-provisioning
Modeling using Auto-provisioning rules for servers allows you to define an automated framework in which each new server is immediately associated with the necessary collections—NetTrace, AppTrace, Logs, etc.
This approach ensures comprehensive and consistent monitoring as soon as a server joins the IT system: network flows are analyzed, application transactions are tracked, logs are collected, and system metrics are integrated.
In addition, view rules can be defined to automatically move items to the appropriate view.
CSV files for packages
A CSV file intended for ServicePilot (per package) generally contains the following information:
- Equipment name
- View (Group or classification folder)
- Policies to apply
- Collection agent
- User-defined tags (environment, site, criticality, etc.)
- IP address or FQDN
- Package-specific parameters
Each line represents an item to be monitored. This simple structure allows thousands of items to be described in a matter of seconds.
Template for firewalls:
# Creation of a Fortigate Firewall resource per site with a Poller Agent per Customer
name,oldname,view,policy,agents,description,tags,ip_address_fqdn,interfaces,interface_filter,enable_monitoring_of_sdwan,discover_only_connected_sdwan,enable_monitoring_of_ipsec

# Customer 1 Firewalls
FW1A,,C1 - Site A - Network,snmpv2,C1-Poller,,,10.1.1.1,true,*,true,true,true
FW1B,,C1 - Site B - Network,snmpv2,C1-Poller,,,10.1.1.2,true,*,true,true,true
FW1C,,C1 - Site C - Network,snmpv2,C1-Poller,,,10.1.1.3,true,*,true,true,true

# Customer 2 Firewalls
FW2A,,C2 - Site A - Network,snmpv2,C2-Poller,,,10.2.1.1,true,*,true,true,true
FW2B,,C2 - Site B - Network,snmpv2,C2-Poller,,,10.2.1.2,true,*,true,true,true
FW2C,,C2 - Site C - Network,snmpv2,C2-Poller,,,10.2.1.3,true,*,true,true,true
Template for applications:
# Creation of an application Web check per site with a Poller Agent per Customer
name,oldname,view,policy,agents,description,tags,web_site_url,polling_interval,expected_http_return_code

# Web checks Customer 1
MyApp1A,,C1 - Site A - Applications,snmpv2,C1-Poller,,,https://MyApp1A,60,200
MyApp1B,,C1 - Site B - Applications,snmpv2,C1-Poller,,,https://MyApp1B,60,200
MyApp1C,,C1 - Site C - Applications,snmpv2,C1-Poller,,,https://MyApp1C,60,200

# Web checks Customer 2
MyApp2A,,C2 - Site A - Applications,snmpv2,C2-Poller,,,https://MyApp2A,60,200
MyApp2B,,C2 - Site B - Applications,snmpv2,C2-Poller,,,https://MyApp2B,60,200
MyApp2C,,C2 - Site C - Applications,snmpv2,C2-Poller,,,https://MyApp2C,60,200
Template for servers:
# Creation of a Windows server resource per site with a Poller Agent + SPProxy per Customer
name,oldname,view,policy,agents,description,tags,icmp_ping,ip_address_fqdn,interfaces,interface_filter,discover_only_connected_interfaces,volumes,drive_letter_and_path_filter,specified_services,services

# Customer 1 servers
SRV1A,,C1 - Site A - Servers,snmpv2,"[SRV1A,C1-Poller]",,,true,10.1.2.1,true,*,true,true,*,true,Netlogon
SRV1B,,C1 - Site B - Servers,snmpv2,"[SRV1B,C1-Poller]",,,true,10.1.2.2,true,*,true,true,*,true,Netlogon
SRV1C,,C1 - Site C - Servers,snmpv2,"[SRV1C,C1-Poller]",,,true,10.1.2.3,true,*,true,true,*,true,Netlogon

# Customer 2 servers
SRV2A,,C2 - Site A - Servers,snmpv2,"[SRV2A,C2-Poller]",,,true,10.2.2.1,true,*,true,true,*,true,Netlogon
SRV2B,,C2 - Site B - Servers,snmpv2,"[SRV2B,C2-Poller]",,,true,10.2.2.2,true,*,true,true,*,true,Netlogon
SRV2C,,C2 - Site C - Servers,snmpv2,"[SRV2C,C2-Poller]",,,true,10.2.2.3,true,*,true,true,*,true,Netlogon
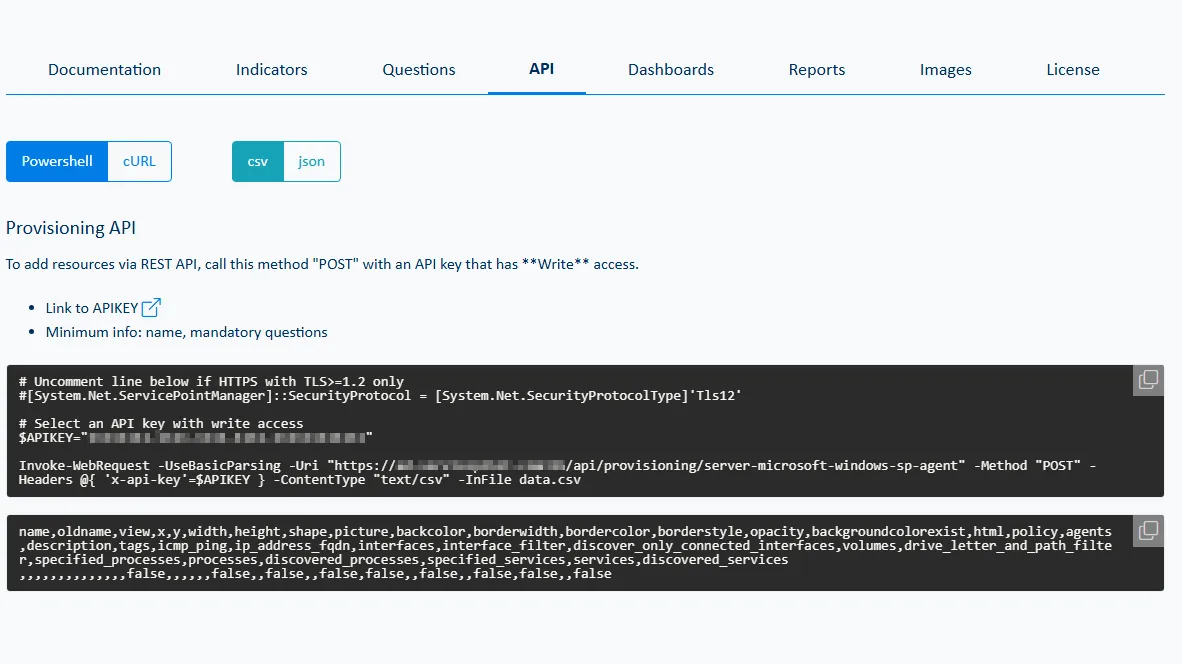
3. Import into ServicePilot
The CSV files are then used to provision resources in ServicePilot.
Powershell script template:
# Uncomment line below if HTTPS with TLS>=1.2 only
[System.Net.ServicePointManager]::SecurityProtocol = [System.Net.SecurityProtocolType]'Tls12'

# Select an API key with write access
$APIKEY="0af8b87c-49c0-40b6-9c39-87bf445cf866"

Invoke-WebRequest -UseBasicParsing -Uri "https://{servicepilot_fqdn}/api/provisioning/view" -Method "POST" -Headers @{ 'x-api-key'=$APIKEY } -ContentType "text/csv" -InFile views.csv
Invoke-WebRequest -UseBasicParsing -Uri "https://{servicepilot_fqdn}/api/provisioning/security-fortigate-firewall" -Method "POST" -Headers @{ 'x-api-key'=$APIKEY } -ContentType "text/csv" -InFile fortigate.csv
Invoke-WebRequest -UseBasicParsing -Uri "https://{servicepilot_fqdn}/api/provisioning/user-webcheck" -Method "POST" -Headers @{ 'x-api-key'=$APIKEY } -ContentType "text/csv" -InFile applications.csv
Invoke-WebRequest -UseBasicParsing -Uri "https://{servicepilot_fqdn}/api/provisioning/server-microsoft-windows-sp-agent" -Method "POST" -Headers @{ 'x-api-key'=$APIKEY } -ContentType "text/csv" -InFile servers.csv
During import, ServicePilot:
- Creates new items
- Updates existing items
There is also a DELETE API that allows you to delete items that you no longer wish to monitor.
Once the CSV has been processed, ServicePilot automatically applies the defined monitoring templates.
It takes a few seconds to import hundreds of items.
Best practices for CSV files
To get the most out of monitoring via CSV, there are a few best practices to follow:
- Standardize names, groups and tagging conventions
- Version CSV files in Git, SVN or version control software
- Separate files by scope (network, servers, cloud, etc.)
- Document the parameters of the monitoring packages used (column headers and CSV field format)
- Only manage resources added via CSV using the provisoning API
These practices enhance the quality, maintainability and scalability of monitoring.
Industrialized, reliable and sustainable deployment
This workflow has several major advantages:
- Quick operational monitoring, no training required for operators
- Easy modification of CSV files to refine modeling
- Reduction in human error
- Traceability thanks to file versioning
Monitoring via CSV file in ServicePilot not only saves time, it is a real lever for scaling. It makes it possible to monitor thousands of devices with ease and reduce human error. For large organizations, it is an essential approach to ensuring modern, scalable and sustainable observability.
