ServicePilot On-Premise
This document applies to the On-Premise installations of ServicePilot where a local administrator will need to install, upgrade, backup and manage the ServicePilot server.
ServicePilot software
The ServicePilot software consists on a number of services and executables that provide different parts of the solution. Follow the links to obtain further information about each of the components.
| Component | Description |
|---|---|
| Manager | ServicePilot Manager service providing the core of the product. It provides the web interface, configures and receives data from Agents, stores data in the Database, generates reports and sends alerts. This service may be run in high availability mode by running multple copies on different machines. |
| Database | ServicePilot Database service managed and used by the ServicePilot Manager. Stores ServicePilot data. This service may be run in high availability mode by running multple copies on different machines. |
| Agent | ServicePilot Agent service, configured by the ServicePilot Manager to poll and receive data from monitored devices. This data is normalized and sent to the ServicePilot Manager for processing and storage. Multiple ServicePilot Agents can be used. |
| Endpoint Agent | ServicePilot Windows Endpoint Agent service, configured by the ServicePilot Manager to monitor a Windows workstation performance. Data collected is normalized and sent to the ServicePilot Manager for processing and storage. Multiple ServicePilot Agents can be used. |
| SPProxy | ServicePilot Proxy executable, allowing ServicePilot Agents to communicate with a ServicePilot Manager if the Agents cannot open a direct connection. The proxy will cache Agent software updates to save bandwidth. This executable is deployed on demand next to a ServicePilot Agent. |
| SPCluster | ServicePilot Cluster service, replicating the ServicePilot Manager and ServicePilot Database configuration and status when running ServicePilot in high availability mode. A quorum of SPCluster services needs to be available before high availability ServicePilot can be started. |
| Console | ServicePilot Windows Console executable, providing a starting point to configure ServicePilot and launch the Manager and Agent services. Service status, logs, licensing and clustering, certificate and data location can be managed. |
| System Tray | ServicePilot Windows System Tray executable, providing quick access to the ServicePilot Console. This executable is started when the user that installed ServicePilot logs in to the ServicePilot server’s desktop. |
| Class Editor | ServicePilot executable easing the creation of custom Class definitions for custom packages. Edits package.pac files. See the ServicePilot documentation under SETUP > Provisioning > How to > Create you own custom package. |
Install ServicePilot
ServicePilot Manager server system requirements
Before you install ServicePilot, check that your system meets some basic requirements.
Contact ServicePilot Technologies for more details if needed.
The following are minimum requirements for a basic monitoring system. More powerful hardware or virtual machines will be required depending on the amount of data to collect and the concurrent usage expected.
- 8 core CPU
- 8GB RAM min
- High performance hard disk with enough space to store ServicePilot data - min 250GB
- Windows server 2016 or later (latest recommended)
Install ServicePilot
For installations of ServicePilot, download the ServicePilot Manager software and install it on your own Windows server.
- Download the executable file for the ServicePilot Technologies web site. ServicePilot engineers will provide the installer URL.
- Follow the Install ServicePilot Manager video to complete the installation of the ServicePilot Manager software.
ServicePilot Agent system requirements
ServicePilot Agents require very little CPU, RAM and hard disk space. When installing the ServicePilot Manager, a ServicePilot Windows Agent is automatically installed on the same server. This might be sufficient to monitor systems on the local enterprise network, however further ServicePilot Agents may be installed to obtain data from remote sites and servers.
As an Administrative user of the ServicePilot, for Agent pre-requisites, download and installation instructions go to SETUP > Agents > Download.
Installing ServicePilot Agents
To install a ServicePilot Agent, as an Administrative user of the ServicePilot, for Agent pre-requisites, download and installation instructions go to SETUP > Agents > Download.
You may also follow the Install ServicePilot Agent video to install ServicePilot Agents that will collect and send data back to the ServicePilot Manager.
Enable HTTPS support with SSL certificates
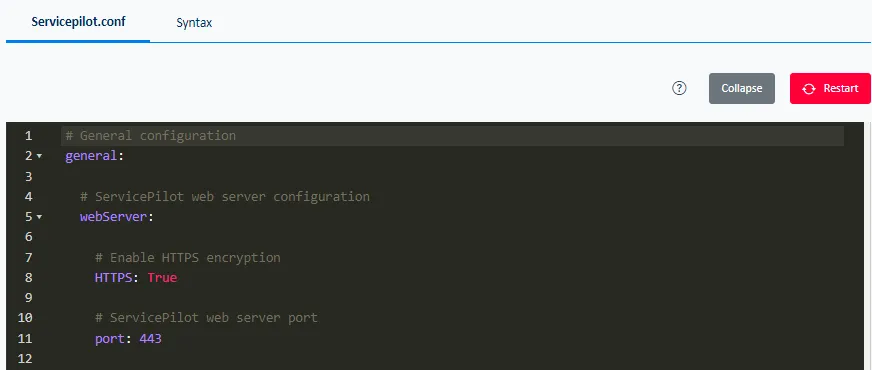
The ServicePilot web interface can be served using HTTPS by enabling this ability in the running configuration and restarting the ServicePilot Manager. ServicePilot will auto-generate a certificate or you can purchase one from a commercial certificate authority.
Note: ServicePilot Agents communicate with the ServicePilot Manager using HTTP or HTTPS. If HTTPS is enabled or the ServicePilot Manager web interface port is changed then all ServicePilot Agents will also need to be re-configured and restarted.
If using a ServicePilot auto-generated certificate, follow these steps to activate TLS support:
- Open the ServicePilot Setup Console and click on the Certificates button.
- Empty the Thumbprint field. Click on OK to save this change.
- Edit the
servicepilot.conffile in the<WorkFolder>\confdirectory. - Add the following information to the general: section:
- Restart the ServicePilot Manager using the ServicePilot Setup Console.
- Once the ServicePilot Manager is restarted, try logging in to the web interface using HTTPS.
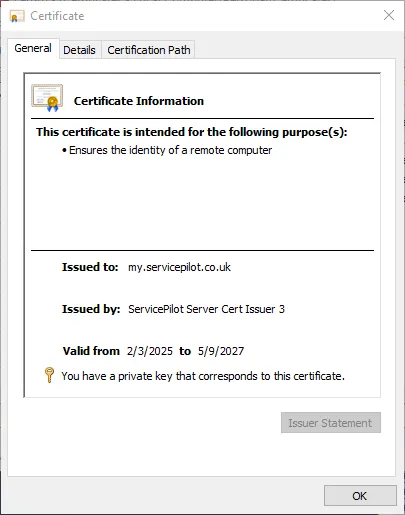
If using a proper server certificate, follow these steps to activate TLS support:
- Place the PKCS12/PFX file on the ServicePilot server.
- Import the certificate into the Windows Local Machine Personal Certificate key store. If the certificate is imported correctly it will be visible in the
certlm.mscapplication with a certificate and key icon.
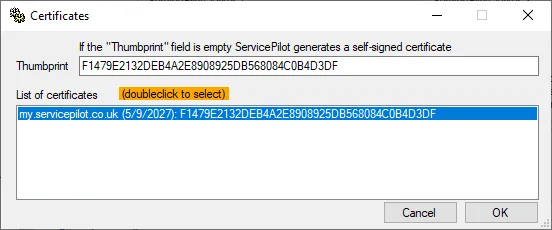
- Open the ServicePilot Setup Console and click on the Certificates button.
- Double-click on the certificate you imported that will be visible in the list if it can be used. The certificate thumbprint will be copied to the Thumbprint field. Click on OK to save this change.
- Edit the
servicepilot.conffile in the<WorkFolder>\confdirectory. - Add the following information to the general: section:
- Restart the ServicePilot Manager using the ServicePilot Setup Console.
- Once the ServicePilot Manager is restarted, try logging in to the web interface using HTTPS.
Configure ServicePilot Agents for HTTPS
All ServicePilot Agents will need to be configured to use the newly secured communication. On each machine with a ServicePilot Agent, including the server on which the ServicePilot Manager is installed, run the following procedure:
- Repair the ServicePilot Agent installation under Windows Settings or Control Panel.
- Correct the configuration to use HTTPS and the correct port number.
- Stop the
spagentdaemon. - Edit the
/etc/spagent/spagent.confagent configuration file to include the correct port and indicate that HTTPS is being used. - Start the
spagentdaemon.
ServicePilot license key
Obtain ServicePilot license
Contact ServicePilot Technologies Support ([email protected]) to get the latest version of the ServicePilot software installer. ServicePilot Support will also provide a license key depending on your needs.
ServicePilot already running
If ServicePilot is already running an the ServicePilot license key is to be updated:
- Log in to the ServicePilot Manager web interface as an administrator
- Click on SETUP > Parameters > License then License key
- Enter the license key provided by ServicePilot and activate online or offline depending on ServicePilot Manager server access to the Internet
ServicePilot not running
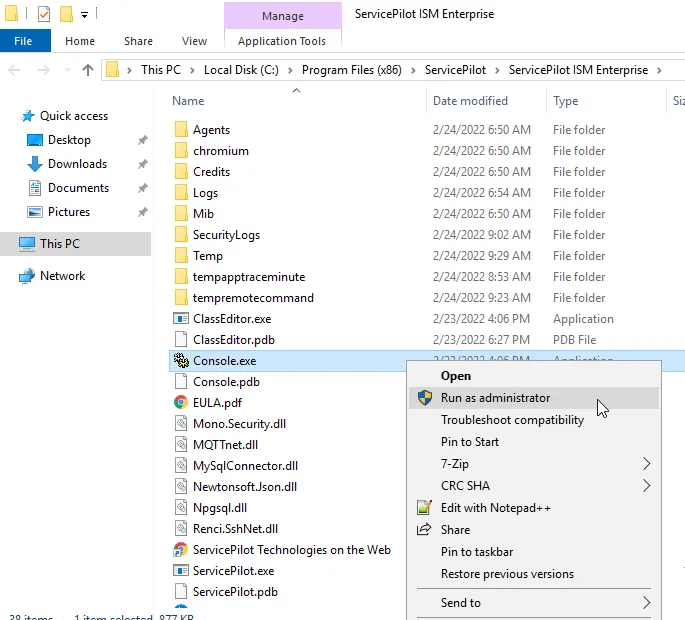
If ServicePilot is not yet running, the licence key can be applied from the ServicePilot Setup Console. To start the ServicePilot Setup Console, navigate to C:\Program Files\ServicePilot\ServicePilot ISM Enterprise\console.exe and run with escalated administrative privileges.
- Click on the License menu item.
- Click on Enter a new license key and accept the license contract.
- Enter the license key provided by ServicePilot and click on Continue.
- If the ServicePilot Manager does not have Internet access:
- Select Activate offline.
- Click on Get an activation by email.
- Send the presented Harware ID to
[email protected]. - Paste the Activation key received by email in to the corresponding field and click on Activate.
- If the ServicePilot Manager server has Internet access then just click on Activate.
Manage ServicePilot
Start or stop the ServicePilot services
Windows
The ServicePilot Manager and ServicePilot Agent services may be started and stopped using the provided ServicePilot Setup Console. These services will be automatically started during boot. This console can also perform initial configuration and allows the administrator to view the state of the ServicePilot components.
Start ServicePilot Setup Console
If the ServicePilot Setup Console is not running then it may be started by running C:\Program Files\ServicePilot\ServicePilot ISM Enterprise\console.exe with escalated administrative privileges.
The ServicePilot Setup Console may be run from the ServicePilot ISM system tray icon by selecting Launch Console.
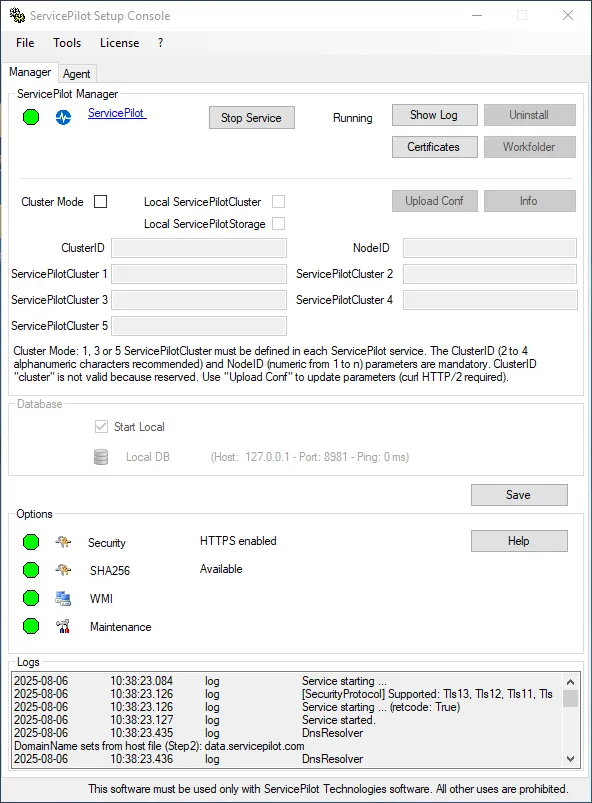
Stop and start the ServicePilot Manager from the Manager tab.

Stop and start the ServicePilot Agent from the Agent tab.
Linux
The ServicePilot Agent registers itself as a Linux daemon. Start and stop the spagent daemon using the standard commands based on your Linux distribution.
Configure outbound email server
To be able to sent email alerts, ServicePilot needs an outbound SMTP relay configured.
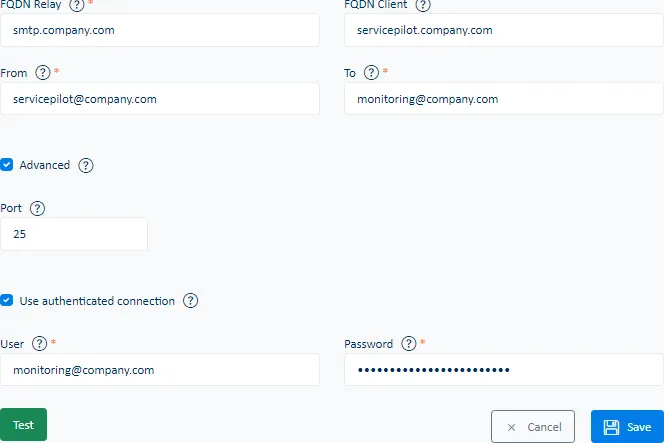
To configure an email server:
- Log in to the ServicePilot Manager web interface as an administrator.
- Click on SETUP > Parameters, then Basic, and then click on Email server.
- Set an SMTP Server host name, From email address and To email address.
- Click on the Advanced features checkbox to add further SMTP server settings that might be required.
- Click Save to save your changes.
- Click Test to bring up a test dialog box allowing you to send test emails to verify your connection.
Troubleshooting SMTP issues
Some email servers now require more authentication before accepting email for delivery. You might need to enable a less secure access method or provide an application specific password for your SMTP service to allow ServicePilot to be able to send email.
Refresh the configuration
To update changes made to packages, you can use one of the two following methods:
Using the ServicePilot interface
- Log in to the ServicePilot Manager web interface as an administrator
- Click on SETUP > Parameters, then Advanced, and then click on Reload
Using the ServicePilot API
The API allows the configuration to be updated automatically without the need to restart ServicePilot. The cURL command below is an example of a request using the API key with write permission 10000000-0000-0000-0000-000000000000 to the ServicePilot server https://data.servicepilot.com.
curl -H "X-Api-Key: 10000000-0000-0000-0000-000000000000" -d "{}" -X POST "https://data.servicepilot.com/api/service/reload"
Authentication
ServicePilot integrates with OpenID Connect / Microsoft Entra ID / Sign in with Google and LDAP or Active Directory external authentication platforms. LDAP or Active Directory defined users can also be associated with ServicePilot groups automatically, removing the need to define each user in ServicePilot.
OpenID Connect integration
To enable remote authentication, add configuration to the servicepilot.conf file and restart the ServicePilot Manager. Users still need to be defined in ServicePilot to assign ServicePilot group membership. Users’ Email addresses need to be used for the Name field when adding the users to ServicePilot.
When defining users in ServicePilot, a password must be filled in even for remotely authenticated users. This needs to be a secure password as it is always possible to log in using a locally defined password.
Microsoft Entra ID
The ServicePilot Single Sign-On URL that will redirect to Microsoft Entra ID authentication ends in /auth_microsoft (Ex: https://servicepilot.company.com/auth_microsoft).
The Sign-in redirect URL to which authenticated users should be returned is /signin-microsoft (Ex: https://servicepilot.company.com/signin-microsoft).
Example of Microsoft Entra ID configuration in servicepilot.conf:
general:
  webServer:
    OAuth:
      MicrosoftClientId: "id"
      MicrosoftClientSecret: "secret"
Sign in with Google
The ServicePilot Single Sign-On URL that will redirect to Sign in with Google authentication ends in /auth_google (Ex: https://servicepilot.company.com/auth_google).
The Sign-in redirect URL to which authenticated users should be returned is /signin-google (Ex: https://servicepilot.company.com/signin-google).
Example of Sign in with Google configuration in servicepilot.conf:
general:
  webServer:
    OAuth:
      GoogleClientId: "id"
      GoogleClientSecret: "secret"
OpenID Connect
The ServicePilot Single Sign-On URL that will redirect to the OpenID Connect authentication server ends in /auth_openid (Ex: https://servicepilot.company.com/auth_openid).
The Sign-in redirect URL to which authenticated users should be returned is /signin-oidc (Ex: https://servicepilot.company.com/signin-oidc).
Example of OpenID Connect configuration in servicepilot.conf:
general:
  webServer:
    OAuth:
      OpenIdAuthority: "https://openid.company.com/"
      OpenIdClientId: "id"
      OpenIdClientSecret: "secret"
The OpenIdAuthority URL is the root URL of the OpenID Connect service (where the .well-known path lives). For example OpenIdAuthority would be https://auth.servicepilot.com/cas/oidc if the OpenID Connect service definition is found under https://auth.servicepilot.com/cas/oidc/.well-known/openid-configuration.
LDAP/Active Directory integration
LDAP/Active Directory user authentication
When authenticating users against a LDAP or Active Directory server it is possible to use the authentication server to verify user passwords for users that are already defined in ServicePilot.
Example of LDAP/Active Directory user authentication configuration in servicepilot.conf:
general:
  webServer:
    authentication: ADPassword
Example of LDAP/Active Directory user authentication configuration in tenant.conf:
groups:
- group: "admin"
  accessLevel: OnPremiseAdmin
  users:
  - user: "user1"
LDAP/Active Directory group authentication
Alternatively the authentication server can be queried to determine which groups a user is a member of. If group authentication is performed then all members of the LDAP or Active Directory group will be assigned to a linked ServicePilot group. Note that each LDAP or Active Directory user must only be a member of zero or one mapped ServicePilot group.
Example of LDAP/Active Directory group authentication configuration in servicepilot.conf:
general:
  webServer:
    authentication: ADUserPassword
Example of LDAP/Active Directory group authentication configuration in tenant.conf:
groups:
- group: "admin"
  ldapGroup: "ServicePilot Admins"
  accessLevel: OnPremiseAdmin
Active Directory server configuration
If connecting to a Microsoft Active Directory server then a NT4 style domain name can be specified. This allows for the use of user names that are not email addresses, for example user1 would map to DOMAIN\user1. It is possible to authenticate users in other domains by specifying the domain at login (DOMAIN2\user2) or use the login email address ([email protected]). Active Directory servers need the isOpenLDAP parameter set to false.
It is possible to authenticate users in an Active Directory forest by using the AD forest LDAP port and GC path (Ex: GC://10.1.1.1).
The path setting should include a search base DN except when using a GC path.
It is recommended to set LDAPEncryption to startTLS although none and ssl options are available. Specify an LDAPS:// path if setting LDAPEncryption to ssl.
Example Active Directory configuration in servicepilot.conf:
general:
  webServer:
    LDAPInfo:
      isOpenLDAP: false
      LDAPEncryption: startTLS
      path: "LDAP://ad.company.com:389/dc=company,dc=com"
      domain: "DOMAIN"
LDAP server configuration
When connecting to a non-Active Directory LDAP server domain is not set, isOpenLDAP is set to true and the path field should include a base DN. A searchUserDN and searchUserPassword may be set if anonymous searches do not allow access to the required user and group information. The userField parameter always implicitly contains uid and mail. If other fields need to be searched for the user ID then this parameter can be specified.
It is recommended to set LDAPEncryption to startTLS although none and ssl options are available. Specify a LDAPS:// path if setting LDAPEncryption to ssl.
Example of LDAP configuration in servicepilot.conf:
general:
  webServer:
    LDAPInfo:
      isOpenLDAP: true
      LDAPEncryption: startTLS
      path: "LDAP://ldap.company.com:389/dc=company,dc=com"
      searchUserDN: "uid=user,ou=people,dc=company,dc=com"
      searchUserPassword: "password"
      userField: "CN"
Internally defined user override
If LDAP or Active Directory integration is active, extra users might still be defined in ServicePilot. This might be useful for super users or special accounts as well as emergency situations when LDAP / Active Directory connectivity is lost. To enable these internally defined users to be authenticated by ServicePilot rather than passing on the authentication to LDAP or Active Directory, internal: true needs to be added per user to these special users in the tenant.conf configuration file.
Example of localadmin user in tenant.conf:
groups:
- group: "admin"
  ldapGroup: "ServicePilot Admins"
  accessLevel: OnPremiseAdmin
  users:
  - user: localadmin
    email: admin@company.com
    password: "lQqnt7I0iBNQUE0X9CXHmI/QGzpf5j1/MVm516K/RI0="
    internal: true
Backup ServicePilot
ServicePilot configuration and data backups
ServicePilot configuration, data and backups are stored in different places depending on if this is a standalone of cluster deployment.
Create a full backup of ServicePilot (configuration and data)
ServicePilot automatically backs up configuration and data in the ServicePilot Workfolder. Customers may copy these backups to another server or snapshot the disk as they wish. These backups can be used when reinstalling the application on a new server, for example, as part of a Windows OS update.
Note that the ServicePilot license key, activation key and server certificate are not stored in the ServicePilot Workfolder so need to be backed-up separatly.
Backup ServicePilot configuration
Copy the following files and directories to create a backup of the configuration:
- The ServicePilot license key, activation key, server certificate and other ServicePilot Setup Console settings.
<WorkFolder>\conf<WorkFolder>\tenants<WorkFolder>\web
Backup ServicePilot data
The ServicePilot data is saved in the running configuration’s WorkFolder. Back up the following directories:
<WorkFolder>\backup<WorkFolder>\csv<WorkFolder>\data
Automatic configuration backup
Once a day ServicePilot also stores the current configuration to the <WorkFolder>\backup directory.
Can database backup sources be deleted?
Old data in the <WorkFolder>\backup directory can be deleted but this may be required if the database gets corrupted of if ServicePilot changes the format of the database. Manually delete source ZIP files if the files will not be needed to restore.
Create a full backup of ServicePilot (configuration and data)
Static configuration for each ServicePilot node is stored in the node specific configuration ISO. ServicePilot tenant configuration and data is then stored in S3. ServicePilot can automatically back up configuration and data to a secondary S3 data storage if this is configured.
Configure S3 backup copy
In the storage.conf file configure the copys3 parameter to send a second copy of the confirguration and data to a different S3 store.
Change database data retention duration
ServicePilot only keeps data in it’s database for a limited time. This is dependent on the type of data stored. For example Object indicator data is kept for 7 days at a resolution of 1 minute whereas the daily summary indicator data is kept for a year. These parameters can be changed in the <WorkFolder>\conf\storage.conf configuration file.
See Data retention for the default retention periods per collection.
Change backup data retention duration
The original source of the ServicePilot database data is stored in the the <WorkFolder>\backup directory. This may be required if the database gets corrupted of if ServicePilot changes the format the the database. The ServicePilot database sources are kept on disk for 730 days by default. This parameter can be changed in the <WorkFolder>\conf\storage.conf configuration file but it shold be larger than any of the data retention duration values.
# Backup retention duration
#RETENTIONBACKUP=730
Upgrade ServicePilot to a new version
It is strongly recommended to create a backup before starting the update process. A quick backup involves stopping ServicePilot and making a complete copy of the running configuration WorkFolder.
Important: Ask ServicePilot Technologies if the database format has changed before starting an upgrade. A backup of ServicePilot configuration and data will be required in this case.
To upgrade the ServicePilot software:
- Stop the ServicePilot Manager and Agent.
- Stop the ServicePilot Setup Console.
- Stop the ServicePilot ISM system tray.
- Run the new ServicePilot installer.
- Install the ServicePilot Manager service in the ServicePilot Setup Console.
- Start the ServicePilot Manager.
Customize ServicePilot
Add custom images to ServicePilot
ServicePilot presents web pages that can contain customer icons and graphics.
Pictures can be uploaded when adding resources to the configuration.
Alternatively, custom images, in JPEG, GIF, PNG or SVG format, can be placed in the running configuration <WorkFolder>\tenants\tenant_#\pictures directory. A logo.webp file added to this directory will be used as a company logo for PDF reports.
Add custom web pages to ServicePilot
The ServicePilot Manager may serve custom web pages to users of the ServicePilot web interface if the HTML files are placed in the running configuration <WorkFolder>\tenants\tenant_#\web directory.
Add custom packages to ServicePilot
ServicePilot comes with many built-in packages. ServicePilot configuration can customize how these templates are used to monitor resources. It is possible to extend ServicePilot capabilities using custom packages for new or specialized equipment.
Custom packages are created by ServicePilot Technologies and are applied by placing them in the running configuration <WorkFolder>\tenants\tenant_#\packages directory. The ServicePilot running configuration needs to be reloaded in order for the new custom packages to be available for use. To reload the running configuration:
- Click on SETUP > Parameters.
- Click on Advanced.
- Click on Packages > Reload.
Debug
Debug ServicePilot errors
ServicePilot Manager and the Windows ServicePilot Agent store their log files in the C:\Program Files\ServicePilot\ServicePilot ISM Enterprise\logs directory. The Linux ServicePilot Agent stores its logs in the /var/log/servicepilot/servicepilotagent.log file.
Consult these files for errors with configuration or communication between the ServicePilot components and monitored devices. Often passwords, IP addresses or port numbers are incorrectly configured when adding monitored equipment. View these logs to see these access errors.
ServicePilot 429 web page errors
If ServicePilot returns HTTP 429 error codes when viewing web pages this normally indicates that the ServicePilot database is overloaded. Too many people are trying to obtain information or too many concurrent complex queries are being made of the system. Please wait and try again later.
This is an additional security feature to help protect against D/DOS attacks.
